
TLDR:In this tutorial, we’ll walk through creating a YouTube Transcription Agent in Langflow.
By the end, you’ll have an AI agent that can transcribe a YouTube video’s audio into text – a handy starting point for summarizing videos, generating captions, or building podcast notes. Let’s dive in!
Get a free Langflow account at http://langflow.datastax.com or use open source or Langflow Desktop (a MacOS app) at http://langflow.org.
Introduction
How can you instantly convert any YouTube video into text using AI – all without writing code? We'll show you how Langflow makes this possible in minutes!
Langflow is an open-source, visual agentic development framework for building AI applications (from chatbots to Retrieval-Augmented Generation, or RAG systems to multi-agent systems) with drag-and-drop, reusable components and rapid iteration of AI workflows.
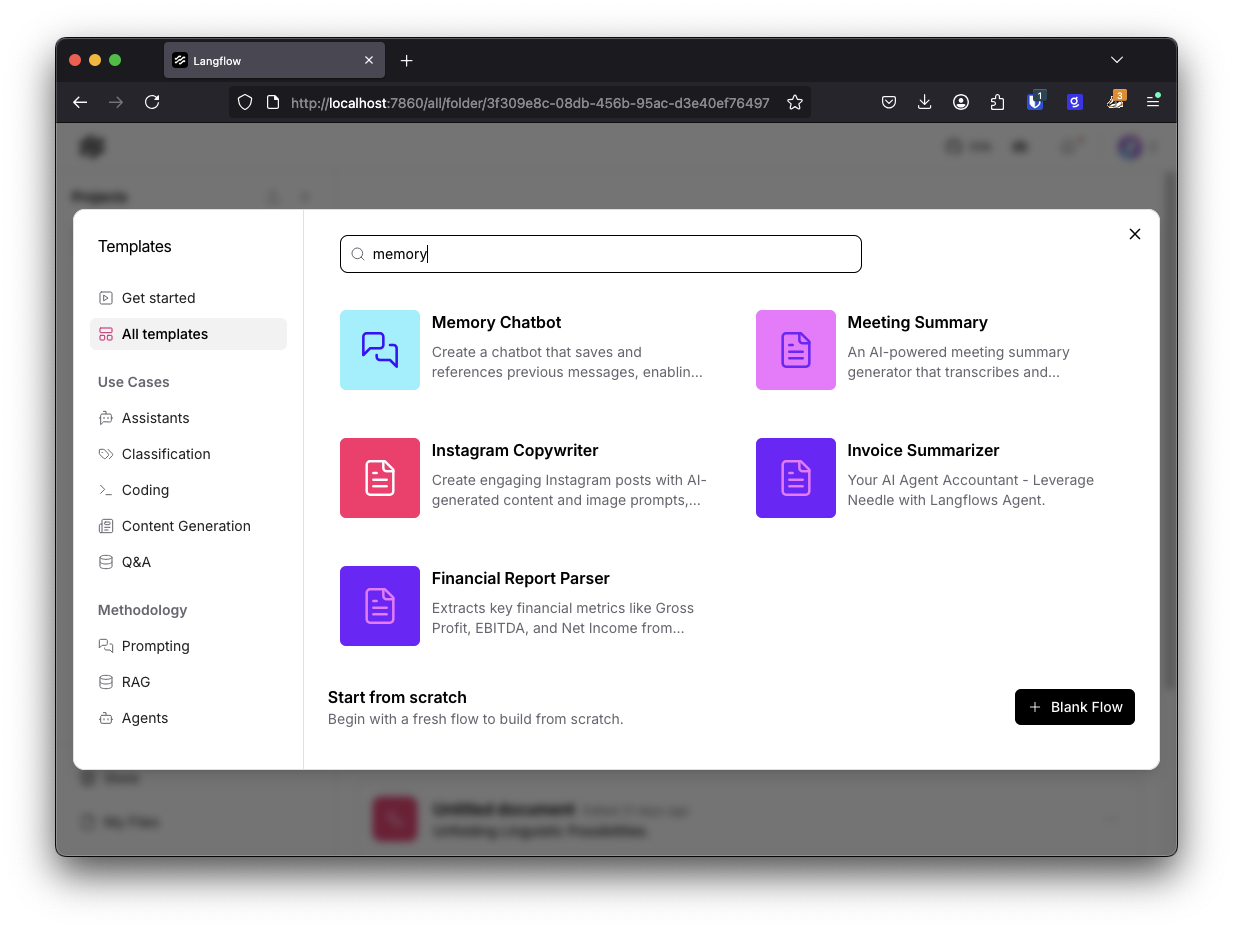
It comes with an extensive library of pre-built template workflows for common agents and RAG workflows, so you can start from examples for tasks like assistants, Q&A over documents, coding help, or content generation. In order to try these template workflows - just add your model API keys and you can try them immediately in the Playground!
In this tutorial, we’ll walk through creating a YouTube Transcription Agent in Langflow. By the end, you’ll have an AI agent that can transcribe a YouTube video’s audio into text – a handy starting point for summarizing videos, generating captions, or building podcast notes. Let’s dive in!
Langflow’s Templates and Components at a Glance
Langflow provides a rich template gallery and a wide range of AI components to speed up development. For example, there are templates for web scraping, document Q&A, chat assistants, and more.
These templates are categorized by use case and methodology, helping you jump-start projects with best-practice setups . You can learn a lot by exploring them and seeing how different components (LLMs, tools, vector stores, etc.) connect. In our case, we’ll start from scratch to learn the basics, but remember that Langflow’s directory likely has similar agent examples you can reference or reuse.

Langflow’s template library of pre-built AI workflows to help you get started.
Overview: Designing a YouTube Transcription Agent
Before we get hands-on, let’s outline what our YouTube Transcription agent will do and which components we’ll use:
Agent (Tool-Using Agent) – This is the brain of our application. Agents are long running AI workflows that have the ‘agency’ to use tools to take actions on tasks. Agents use a language model to understand your request (like “Transcribe this YouTube video”) and decide which tool to use to fulfill it. Agents can also use private data in a vector database for retrieval augmented generation (RAG).
LLM (Large Language Model) – The agent’s reasoning engine. You can use an OpenAI model (such as GPT-3.5/4) or any other hosted or local LLM available in Langflow to power the agent’s understanding and responses.
Transcription Tool – An external tool that actually fetches or generates the transcription from a YouTube video. We’ll use AssemblyAI as our transcription tool, since AssemblyAI’s API can take a video URL and return the audio transcript. (You could also integrate other services or APIs for this purpose.)

Langflow offers components for many AI services such as AssemblyAI. You can also create custom components for any API, model, or data source.
Tool Mode – A special setting that lets the agent invoke the transcription component as a tool . We’ll enable Tool Mode on our transcription component so the agent can call it whenever it needs.
Playground (Testing Environment) – Langflow’s built-in chat interface to immediately test our agent. We’ll use it to give the agent a YouTube link and get the transcribed text back.
With this plan in mind, let’s build step-by-step.
Step 1: Add an Agent Component
First, open Langflow and create a new workflow (or use an empty canvas in an existing project). From the Components panel, find and drag an Agent component onto the canvas. This Agent will orchestrate our transcription task. In Langflow 1.1 and above, the Agent component is designed for complex reasoning and can use tools to fulfill user requests . Think of it as the controller that will decide how to get the job done – in this case, by calling a transcription tool.
Adding an Agent component in Langflow. The agent will use an LLM to decide which tools to use for fulfilling user requests.
After placing the Agent on the canvas, you might notice it has several input ports (for connecting an LLM, tools, etc.) and output ports (for the agent’s answer or chat output).
We’ll connect those soon. For now, just give your agent a recognizable name (e.g., “YouTubeTranscriberAgent”) by clicking on it and editing its title – this is optional but helps keep track of components in larger flows.
Step 2: Select and Connect an LLM
Every agent needs a language model to function as its reasoning engine. Langflow supports many LLMs (OpenAI, Azure, HuggingFace, and others). For beginners, OpenAI’s GPT-3.5 Turbo is a great choice due to its strong performance with language understanding.
(You might have noticed in the Agent component above that you can also add your OpenAI key directly into an field for the agent to use OpenAI.)
From the Models or LLMs section of the components panel, drag an LLM component (e.g., the OpenAI Chat model component) onto the canvas. Enter your API key and select the model (for example, “gpt-3.5-turbo”). Now, connect the LLM’s output to the Agent’s LLM input port. In Langflow, you create connections by dragging a line from the output port of one component to the input port of another. Once connected, our Agent now has a “brain”! It knows it can rely on this LLM to interpret instructions and converse.
Drop in an LLM component (such as OpenAI above) and input your API key
Tip: You can choose any provider or even a local model. Langflow’s interface lets you select a provider and model via a dropdown, or leave it on “Custom” if you plan to attach a different model component manually. For this guide, we’ll stick with OpenAI for simplicity.
Step 3: Add the YouTube Transcription Tool
Next, we need a tool that actually does the transcription. Langflow’s strength is that it allows agents to use external tools like web search, calculators, or in our case, a transcription service. We’ll use AssemblyAI for this purpose, since it provides a speech-to-text API and Langflow has built-in components for it .
In the components panel, look for AssemblyAI under Integrations (make sure you have Langflow version that includes it). We’ll use two components from AssemblyAI: Start Transcript and Poll Transcript.
AssemblyAI Start Transcript: This component sends a YouTube video’s audio to AssemblyAI for transcription. It needs an input for the audio/video file URL (we’ll use the YouTube link) and returns a Transcript ID . Place this on the canvas. Enter your AssemblyAI API Key in its field (you can get a free API key from AssemblyAI’s website ). For the “Audio File URL” field, we won’t hardcode anything – instead, we’ll let the agent supply the YouTube link at runtime.
AssemblyAI Poll Transcript: This component checks the transcription status until it’s done and then outputs the final transcription text . Place it and connect its Transcript ID input to the Transcript ID output of the Start component. This wiring means once a transcription is started, we can retrieve the result when ready.
At this point, we have a little sub-flow for transcription. To recap: the agent will provide a YouTube URL to the Start Transcript tool, which sends it for processing, and then Poll Transcript will output the completed transcript text.
Note: AssemblyAI will process the audio asynchronously, but the Poll component abstracts the waiting – it keeps checking until the transcript is available . This ensures our flow ultimately gets the text back.
Step 4: Enable Tool Mode for the Transcription Components
Now comes the magic that makes this an agent: enabling Tool Mode. By default, components in Langflow execute in a fixed flow. Tool Mode, however, lets the Agent dynamically call a component as a function (tool) when needed . In simpler terms, it turns our transcription components into a service the agent can invoke in real-time based on user requests.
For each of the AssemblyAI components (Start and Poll), enable the Tool Mode option. To do this, click the component and look for a toggle or checkbox labeled “Tool”. When you enable Tool Mode on a component, you’ll often need to specify which field the agent can fill. In our case, for Start Transcript, we want the agent to supply the Audio File URL. Langflow might automatically handle this when connecting to the Agent, or you may need to mark the URL field as agent-controlled. (If a component doesn’t have a Tool Mode toggle, you can still configure it via its input settings to be used as a tool, but AssemblyAI components should support it out-of-the-box.)
In Langflow, enabling Tool Mode on a component allows the Agent to call it as a function. Here, a URL loader component’s Tool Mode is active, so the Agent can control its URLs input at runtime .
When Tool Mode is active, the Agent recognizes the transcription tool and knows what input it expects (e.g., a URL). Under the hood, Langflow registers it as an available tool with a description for the agent. The agent’s LLM will “see” something like: Tool available: AssemblyAI-Transcribe – use this to transcribe audio from a URL. So if the user asks for a YouTube transcription, the agent’s reasoning (powered by the LLM) will decide to call this tool, provide the YouTube link as the URL parameter, and wait for the result .
Step 5: Connect the Agent to the Transcription Tool
We have the agent, the LLM, and the transcription tool components ready – now we wire the agent to the tool. Connect the Agent’s Tools port to the AssemblyAI Start Transcript component (or to a chain including both Start and Poll). In Langflow, connecting a tool to an Agent typically involves linking the agent’s “Tools” output to the input of the tool component. Once connected, Langflow knows this Agent can use that tool.
You might wonder: how does the agent get the final transcribed text? We need to ensure the Poll Transcript output flows back into the Agent so it can use it in its answer. To do this, connect the output of Poll Transcript (the transcription text) to the Agent’s input (often the Agent has an input that can accept the tool’s return, possibly a “memory” or an intermediate state input). In some Langflow versions, the agent component might have a special input for tool outputs, or the tool’s output can be routed to the agent’s return path automatically. Check Langflow’s documentation for the exact mechanism, but generally the pattern is: Agent → Tool, and Tool’s result → Agent, so the agent can include it in the final response.
At this point, our flow is set up. We have an agent that, when asked, will call the AssemblyAI transcription tool to get a YouTube video’s transcript and then respond with that text. Don’t forget to save your flow!
Step 6: Test Your Agent in the Playground
Now for the moment of truth: testing our YouTube Transcription Agent. Langflow provides a convenient Playground for interacting with your flow in a chat-like interface. Click the Playground button (usually at the top of the editor). This opens a chat window where you can type messages to your agent and see its responses.
Langflow’s Playground lets you chat with your agent to test it. Simply hit the Playground tab, enter your query, and watch the agent use the tools and respond.
To test our agent, try an example prompt. For instance, you could paste a YouTube video URL and ask: “Transcribe this video for me:” followed by the link. When you send this message, the agent’s LLM will analyze the request. Because we connected the transcription tool, the agent knows it can use that tool. You should see the agent’s chain-of-thought in the Playground (it might first decide “I should use the transcription tool”).
Langflow’s Playground will show the intermediate steps as the agent calls the tool, waits for the transcript, and then returns the final answer . Once the transcription is done, the agent will output the text of the video. This may take a little time if the video is long, since the agent is waiting on the external API. Be patient – you’ll eventually get the full transcript in the chat output.
One great thing here is that you can watch the agent reasoning. The Playground often displays traceable steps or thoughts, which is super helpful for debugging or just understanding what the AI is doing. In our case, you might see the agent thinking something like: “User asked for a transcription. I have a tool for that, let’s use it.” Then it will show that it called AssemblyAI, and finally, it prints the transcribed text. If something doesn’t work, these traces will help you identify if maybe the tool wasn’t connected properly or an API key is missing.
Once you see the transcript text, congratulations! Your Langflow YouTube Transcription agent is up and running.
Wrapping Up and Next Steps
In this project, we introduced how Langflow simplifies building an AI agent that can transcribe YouTube videos. We started by leveraging Langflow’s rich library of templates and components, then assembled a custom flow with an Agent, an LLM, and an external transcription tool. Along the way, we saw how Tool Mode empowers the agent to use that tool autonomously , and we tested everything in the interactive Playground.
From here, you can extend this agent in fun ways. For example, after getting the transcript, you could add another step where the agent summarizes the video or answers questions about it using the LLM. Langflow’s visual interface makes it easy to keep expanding your flow – you could plug in a Vector Store, such as Astra DB, to allow question answering over the transcript (treating the transcript as a knowledge base), or add other tools (like a web search) for more capabilities. Feel free to explore the many agent templates in Langflow’s gallery for inspiration and to see how complex workflows are built.
What's Next? Ready to build your own AI agents? You can try Langflow right now – it’s open source and available on GitHub . For a hassle-free setup, download Langflow Desktop (a one-click app version), or simply create a free cloud account at langflow.datastax.com to design and deploy flows in your browser.
With Langflow’s low-code approach, AI development becomes a playground of possibilities. Give it a go, and be sure to explore the community and template directory for more great ideas. Happy building!


