
One of my favorite features of AI-powered IDEs like IBM Bob, Cursor, or VS Code with GitHub Copilot, outside of generating code and saving me a lot of time, is that they can generate commit messages based on the changes you've made.
I wanted to build my own AI agent to handle this for me in my usual development environment with more control over how the commit messages are written. Here is how I built a commit message generator using Langflow and a Git MCP server.
Getting started
If you want to build the same flow, you'll first need to install Langflow. You can either download Langflow for Desktop or follow the instructions in the documentation to install Langflow. You'll also need Node.js and uv installed, as the MCP servers use npx and uvx to run.
Start Langflow and create a new flow. If you want to skip building the flow, you can import the flow JSON from here. Otherwise, start with a blank flow and drag Chat Input and Chat Output components onto the canvas.
Drag in an Agent component and connect the Chat Input to the Agent input and the Agent response to the Chat Output.
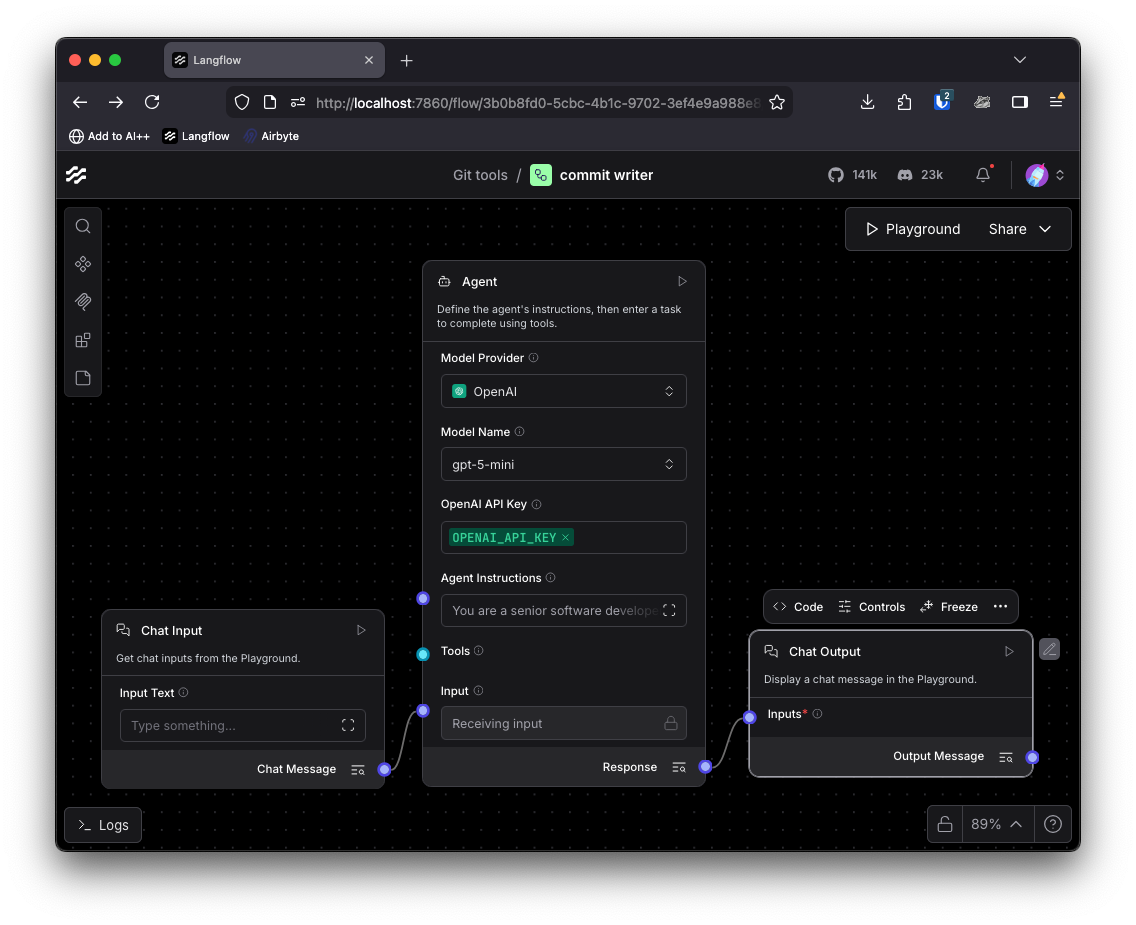
The Agent component can be equippped with tools that it can choose to use in order to complete its goal.
Adding MCP tools
This commit message generating agent will need access to a Git repository in order to see what has changed and summarize it for us. I also want to give it read access to the filesystem in case it wants more context on a file that it can't get from Git. For this, we can use the Git MCP Server and Filesystem MCP server that are built by the official MCP project.
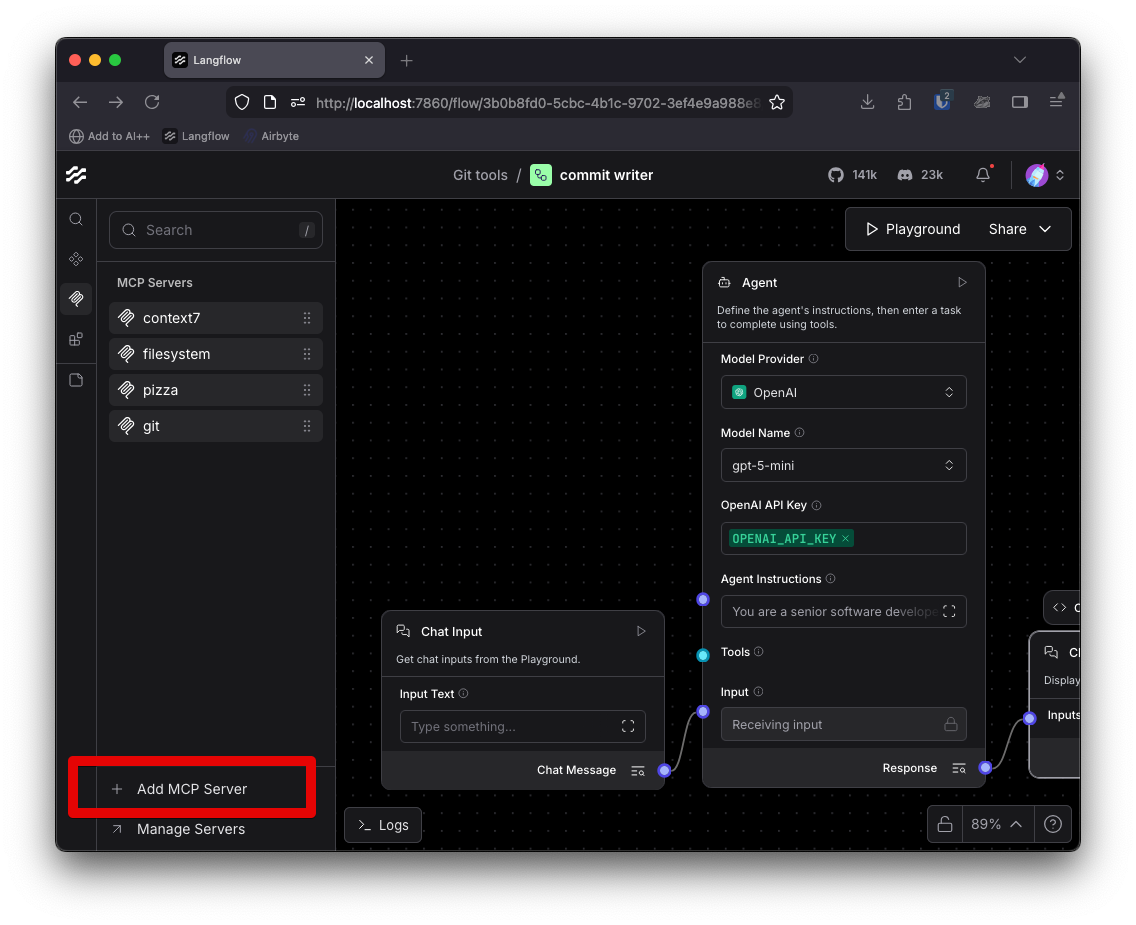
To use MCP servers in Langflow select the MCP sidebar and then click on Add MCP Server at the bottom of the page. It will ask for JSON config for the server.
For the filesystem MCP server you can use this JSON config:
{
  "mcpServers": {
    "filesystem": {
      "command": "npx",
      "args": [
        "-y",
        "@modelcontextprotocol/server-filesystem",
        "/path/to/your/project"
      ]
    }
  }
}
Make sure you set the path to your project correctly, it controls which files the MCP server has access to.
For the Git MCP server you can use this config:
{
  "mcpServers": {
    "git": {
      "command": "uvx",
      "args": ["mcp-server-git"]
    }
  }
}
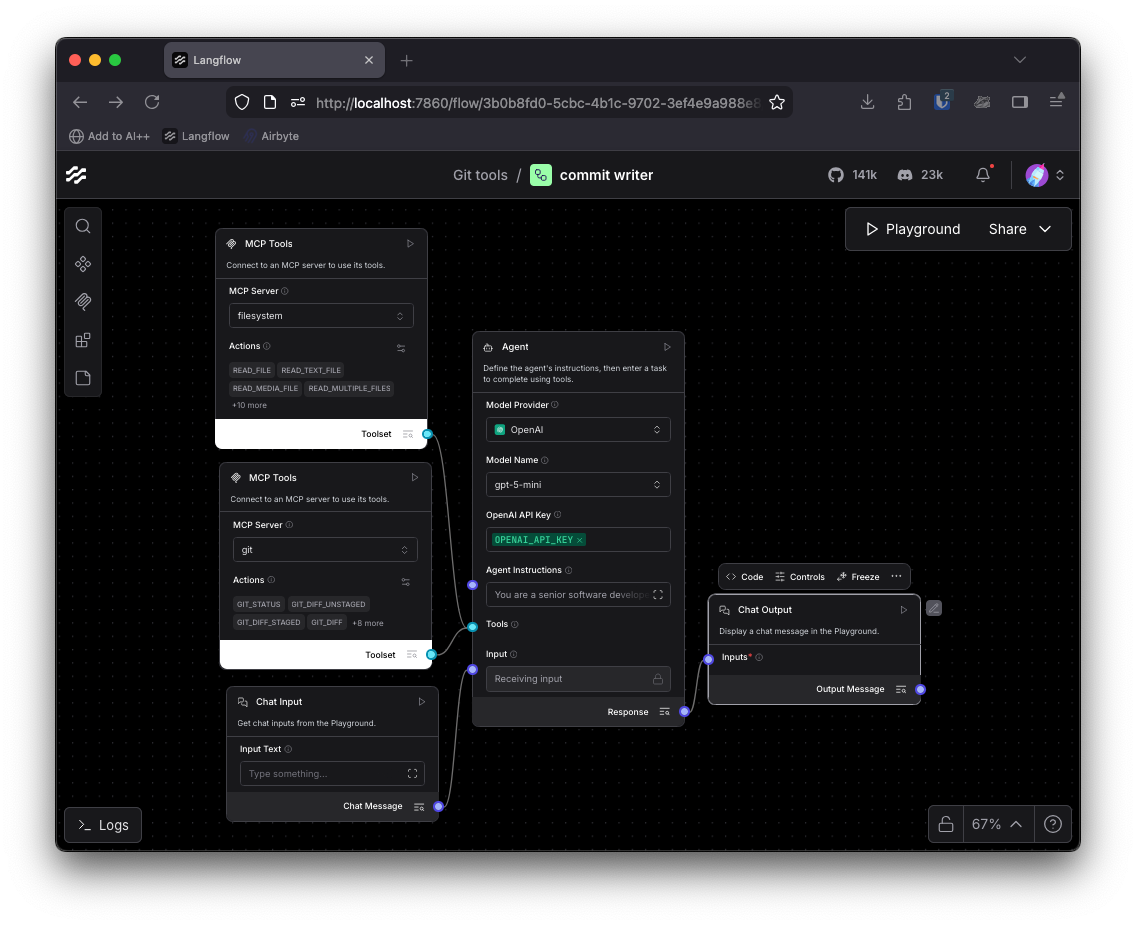
Once you have configured the MCP servers, you can add them to the canvas like any other component. Add both the filesystem and Git servers and turn on Tool Mode for them both, then connect them to the Agent component.
Your flow should look like this now.
Editing the MCP tools
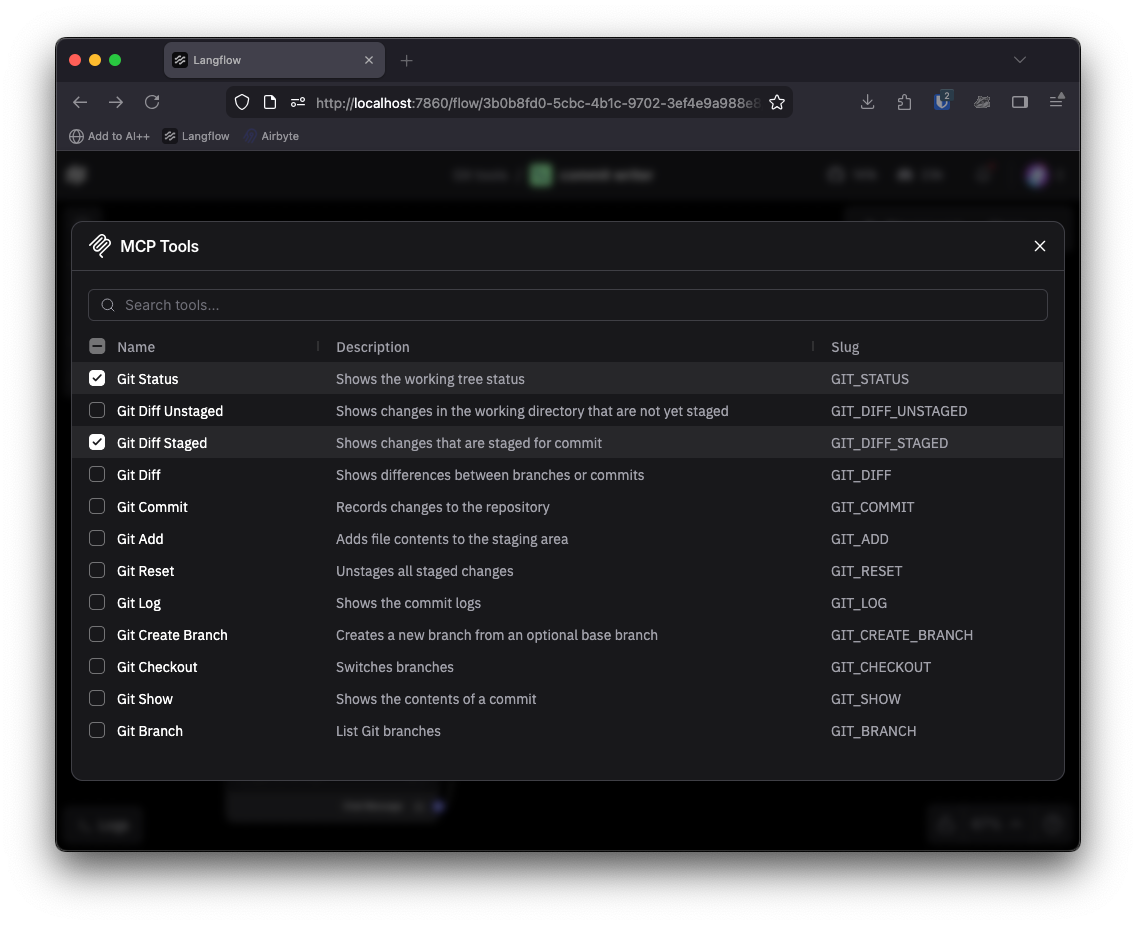
To create a commit message based on the changes that have been made in a project the agent will need to be able to see what has changed and read whole files for further context. By default all the MCP server tools are available, but we should limit that so the agent can't do things we don't want it to do.
In each of the MCP components you can select the settings icon next to the Actions list. This will give you the chance to edit the available tools and even the descriptions. For this agent you will want to check READ_TEXT_FILE and READ_MULTIPLE_FILES for the filesystem MCP server and GIT_STATUS and GIT_DIFF_STAGED for the Git MCP server. Leave the rest unchecked, though feel free to come back and extend the behavior of the agent later.
Prompting
To complete our agent we need a prompt to ensure it creates a commit message to our liking. This is mostly up to you and the way you want to write out messages. With the following prompt I opted to use Conventional Commits plus further details on the changes if required. I also needed to tell the model I was using to not add any other content around the message.
My prompt looks like this:
You are a senior software developer and expert git user. Your job is to read the git diff for staged changes in a repository and generate a commit message.

You should read everything that has changed and then create a commit in the style of conventional commits.

You can read whole files if you need to get more context on a change.

You should write a concise description and, if necessary, expand with further description in the body of the commit message. Only include descriptions for major functionality in the staged files.

Only return the commit message or an explanation of why you could not create a commit message. Do not return backticks or other framing content.
Add the instructions to the Agent component's Agent Instructions field.
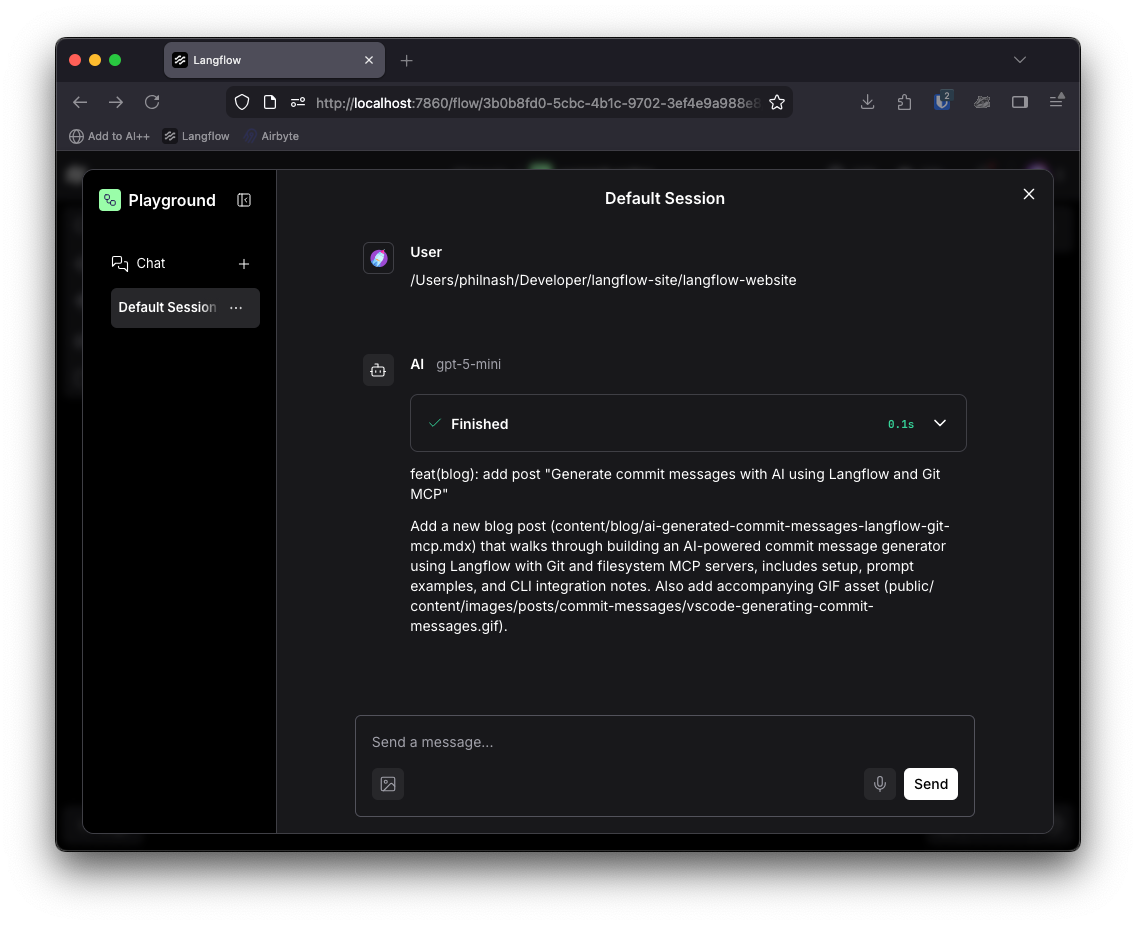
Testing out the flow
You can test the flow out by clicking on Playground and entering the path to the repo you want the agent to look at. It should return you a commit message worthy of your prompt.
Integrating the flow in your development
You can continue to use the flow from the Playground, but I normally use Git from the command line and wanted to integrate the flow there. It turns out that if you name a command line application git-something then the Git application will alias git something to that (as well as aliasing git help something to man git-something).
With the help of Bob I built a quick command line application in Node.js that would integrate with the Git CLI. You can check out the full code for my git-ai-message helper on GitHub.
The most important part of the code is the part where it runs the Langflow flow. It uses the Node.js client for Langflow to send the current working directory to the flow as the input, and prints the output so you can use it yourself.
async function runLangflowFlow(config) {
  try {
    const langflowClient = new LangflowClient({
      baseUrl: config.langflowUrl,
      apiKey: config.apiKey || undefined,
    });
    const flow = langflowClient.flow(config.flowId);

    const currentDir = process.cwd();
    const response = await flow.run(currentDir);

    console.log(response.chatOutputText());
  } catch (error) {
    console.error("Error running Langflow flow:", error.message);
    if (error.response) {
      console.error("API Response:", error.response.data || error.response);
    }
    process.exit(1);
  }
}
You can pull the repository, install the dependencies with npm install and then link it locally with npm link. You will then be able to call git-ai-message or git ai-message and generate commit messages from your own work.
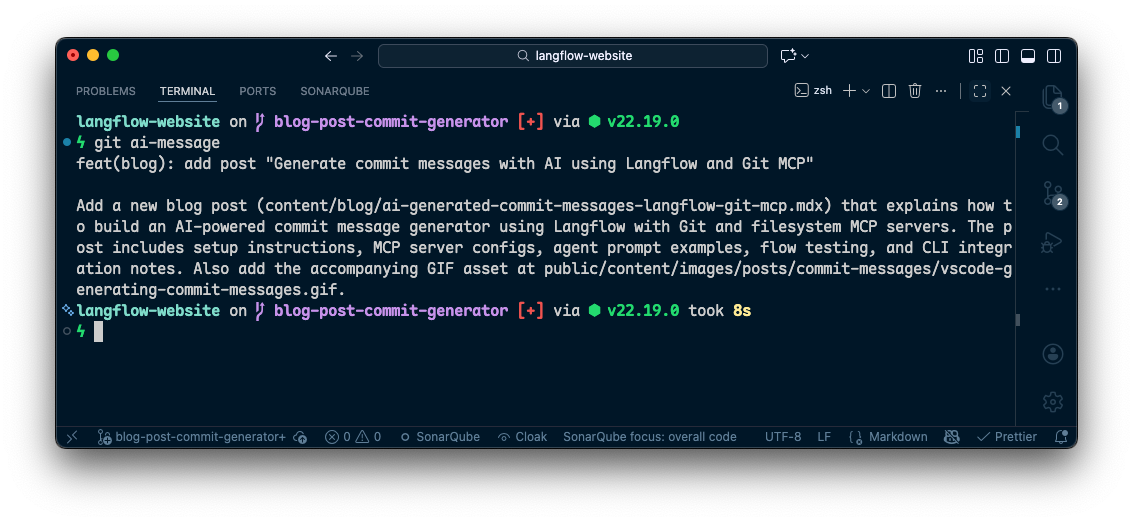
If you're feeling confident about your commit messages, you could even pipe the result into the commit command and automate the whole thing with this line:
git ai-message | git commit -F -
Wrapping up
That's how I built my own AI-powered commit message generator with Langflow and MCP servers. The best part about building it myself is that I have complete control over how my commits are formatted and what context the AI considers when generating messages.
The flow is flexible too. You can customize the prompt to match your own commit message style, add more MCP tools for additional context, or extend the agent to handle other Git workflows. And by integrating it into the Git CLI, I can use it seamlessly in my normal development workflow without switching contexts.
If you want to try it out, you can find the complete code for my git-ai-message CLI tool on GitHub including the JSON for the flow that you can import to your own Langflow install. If you build something similar or extend this flow in interesting ways, I'd love to hear about it in the Langflow Discord community.
FAQ
What is a Langflow agent?
A Langflow agent is a component that follows your instructions to complete a task, and can optionally use connected tools to gather context before responding.
What is MCP?
MCP (Model Context Protocol) is a standard way to give an AI agent access to external tools and data sources, like Git or your filesystem, so it can do more than just “guess” from a prompt.
How do you use MCP in Langflow?
You add MCP servers in Langflow’s MCP sidebar using a server config, drop the MCP components onto the canvas, and connect them to your agent so the agent can call those tools when it needs to.
Why combine a Langflow agent with MCP for commit messages?
Because the agent can base the commit message on real project context (like what changed), while you still control the format and tone through the agent instructions.
What’s the simplest way to make this feel like part of your normal Git workflow?
You can wrap the flow in a small CLI command that calls the Langflow API so you can run it from the terminal and use the output as your commit message without leaving your usual development setup.


