
I have always been interested in web accessibility, but writing alternative text (alt text) for images on a web page is one of those things that seems simple but can be quite complex.
One thing that really impresses me with multimodal LLMs is how good they are at understanding and describing images. I was inspired by the journey that Dries Buytaert went on to generate alt text for 9,000 images on his website as well as Jared Cunha’s tips on writing alt text with AI, so I wanted to build my own app that could take the advice from both of them and build an app that helps you write better alt text.
I combined Langflow, OpenAI models, and Next.js to create an AI-powered alt text generator that I called AltTextr (bring web 2.0 style names back!). Let’s look at how you can build a flow that looks like this:

That powers an app that looks like this:
Writing Good Alt Text
Before we dig into how to build the application, we should consider what good alt text is and how we can design an app to help.
Alt text is an attribute on an <img> element that provides a text description of an image that can stand in place of the image if it doesn’t load or when accessed by assistive technology, for example, a screen reader. MDN says: "The fundamental guideline for the alt attribute is that every image's alternate text should be able to replace the image without altering the meaning of the page."
So, alt text is both important and hard to get right. It also means that asking an AI model to describe an image is not good enough, you need to provide it with the context, important points to highlight in the image, and any other information that will help direct the description. Using AI to generate text like this is often not perfect, but a good starting point, getting maybe 80% of the way there. So, making an interface that encourages editing the result will help to create a tool that helps a user and the AI get a better result than on their own.
Let's see how you can build an app like this with Langflow and Next.js.
What you’re going need
Building this application will require:
- Langflow: the easiest way to get started is with Langflow Desktop application, you can check alternative ways to install Langflow in the documentation
- Node.js - I’ll be using the latest LTS at time of writing, version 22
- An OpenAI API key
Once you have those, power up Langflow and let’s start building.
Build the AI flow
To handle the generative AI side of the application we will build a flow in Langflow. Start by creating a new blank flow, then drag in a Chat Input component. This is where we input our image and any other details we want to share with the model.
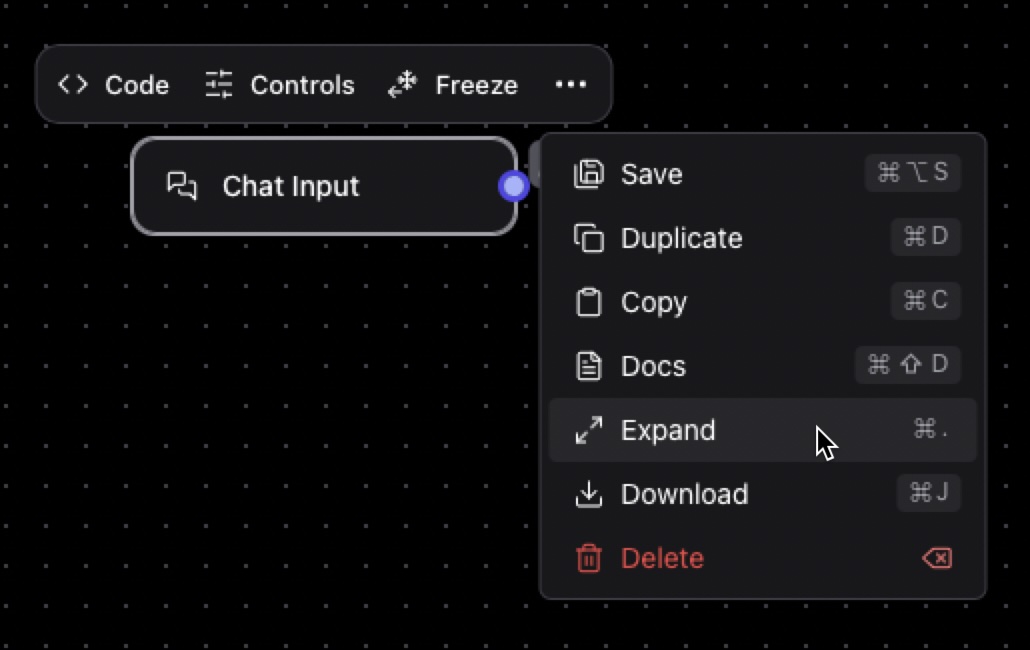
Expand the Chat Input component by clicking on the component, then the three dots on the menu, and then Expand. Now click on the Controls menu and enable the Files Input.
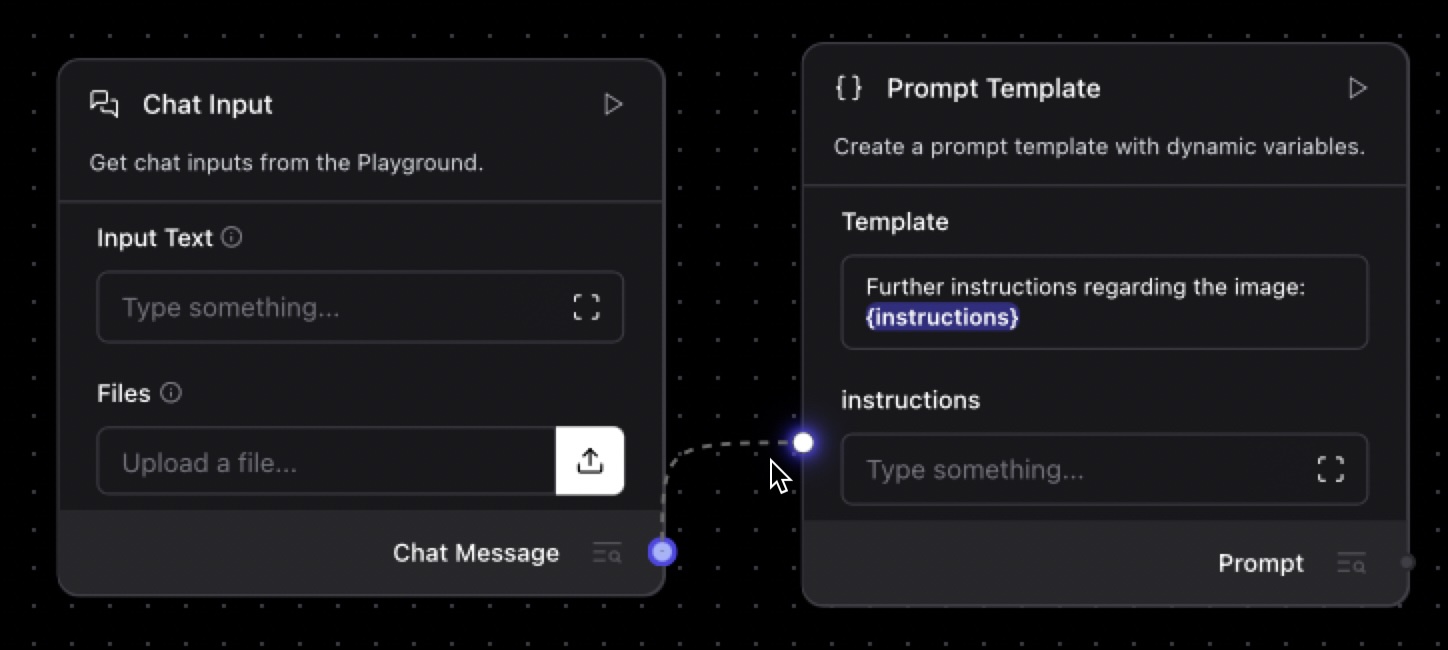
Next drag on a Prompt Template component. This component can be used to combine your prompt with input from a user or something else in the flow. In this case, we are going to pass along further information about the image, to help the model describe the image in context.
Open the template field and enter the following: "Further instructions regarding the image: {instructions}".
Using curly braces in the template creates an input to the component. Save the template and then connect the chat message output from the Chat Input component to the instruction input on the Prompt Template component.
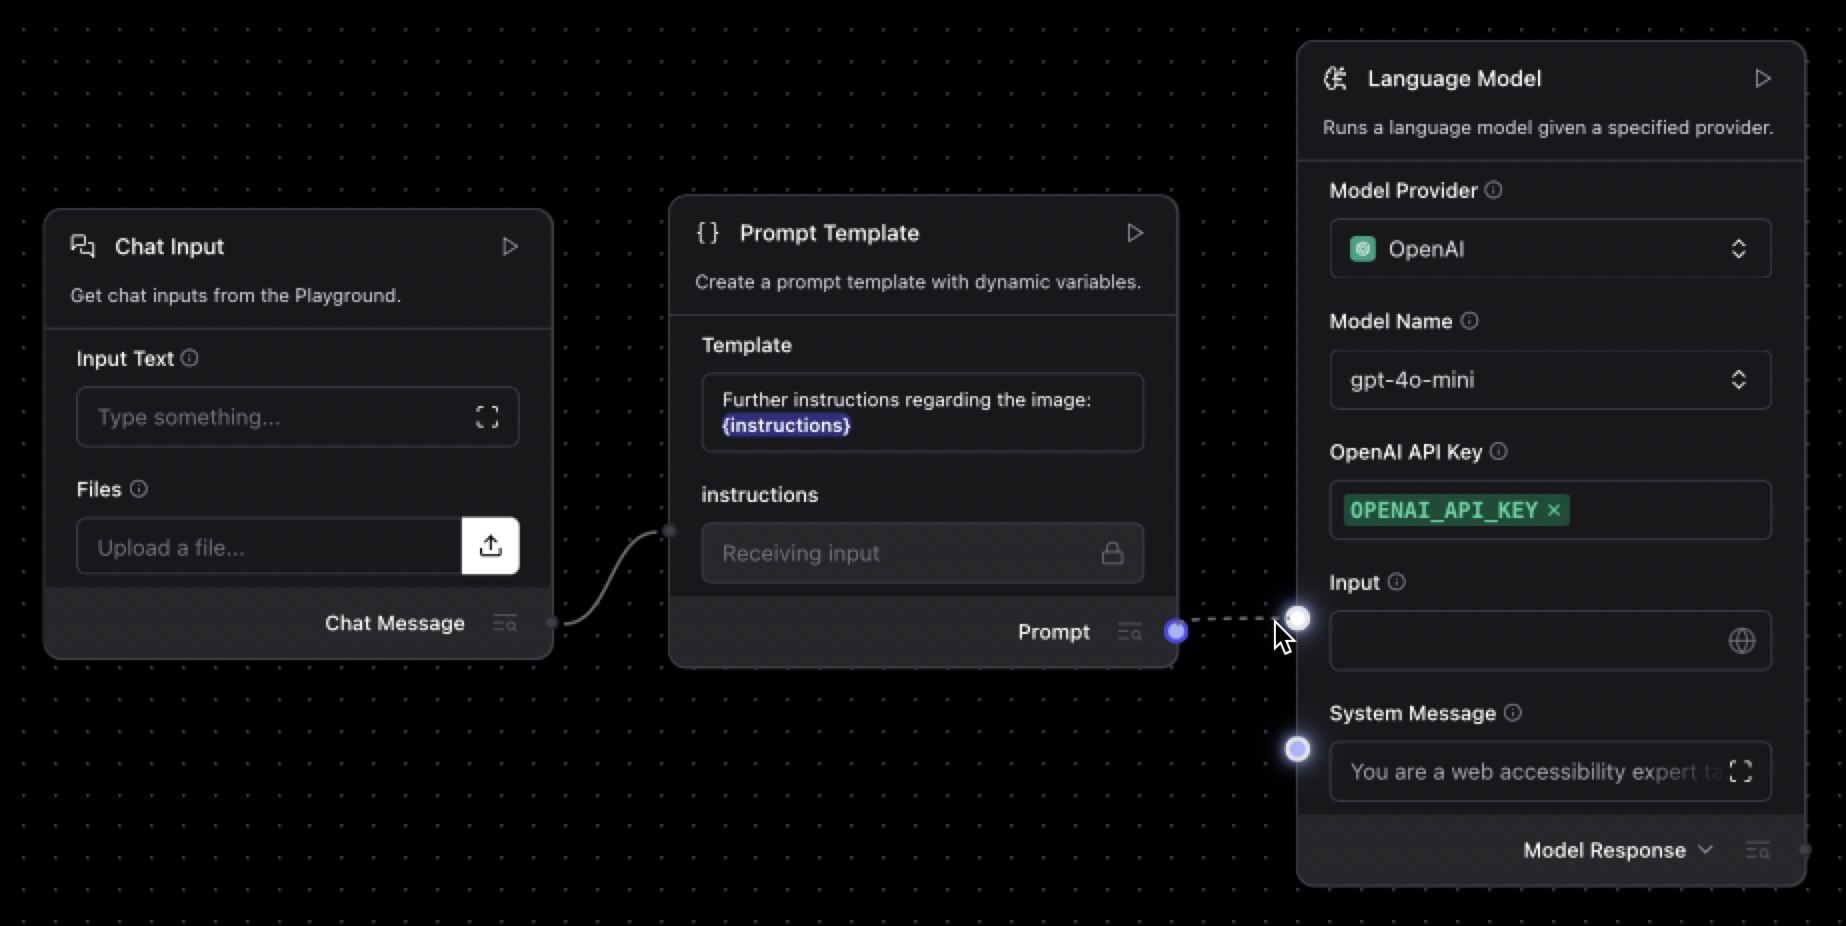
Find the Language Model component and drag it onto the canvas. This is where we are going to set up access to the OpenAI model that will describe our images. Choose OpenAI as the model provider and pick a model, I’ll be using gpt-4o-mini.
To connect to the API, you’ll need your OpenAI API key. You can enter this directly in the component or click on the globe icon and create a new global variable that you can reuse throughout your other flows.
The system message passes our instructions to the model for how it should create a response; it is here that we should direct the model to create useful alt text for our image. My attempt at a system message that follows the recommendations from this article is:
"You are a web accessibility expert tasked to write alt text for images. The text should be descriptive but concise. You may be provided with further details about the context of the image or points to focus on; you should use those as best you can to describe what the user needs. Try to keep your responses to two sentences max."
Connect the prompt output from the Prompt Template component to the input to the Language Model.
To finish the flow, drag a Chat Output component onto the canvas and connect the Language Model component’s model response to the input.
Your flow should look like this:
You can now test this flow out in the Playground where you can upload images and provide context in the chat box before running your flow. This is a good place to try things out and adjust settings like the system message or the temperature of the model.
Once you are happy with the flow, you can integrate it into an application.
Calling Langflow from Next.js
The application I built around this Langflow flow is a Next.js application. It’s just a single page where you can upload an image and enter text for context about the image. To connect the application to Langflow, we’ll need to be able to submit the image and text to a server, then send it on to the Langflow API, before showing the response on the front-end.
We’ll just explore how the app calls Langflow, but you can see all the source code for the app on GitHub.
The Langflow API
To use the Langflow API from within the application, first install the Langflow JS Client:
npm install @datastax/langflow-client
You’ll need to fill in some variables in order to access Langflow by the API. You can see the variables you’ll need in the .env.example file.
With the flow open in Langflow, click the Share menu, then API access. In this panel you can find the base URL for your flow, which is http://localhost:7860 by default. You can also find the flow ID in the URL, like this http://localhost:7860/api/v1/run/${FLOW_ID}. If you have set up authentication on your Langflow install, you will also need to generate an API key.
Finally, you will need the ID of the Chat Input component. Close the API Access window, click on the Chat Input component and then open the controls. You’ll find the ID at the top of the modal.
Next.js forms and server actions
In the application, we need a form in the interface where a user can upload an image, set the text for context and submit. Let's look at a simplified version of the form component from the app. You can also check out the full version on GitHub.
We’ll start with some hooks. We’re going to use a React server function to make the request to the API, so we use the useTransition hook to keep track of the state of the call to the server. We also store the state of the call to the server as a result using useState.
"use client";

import React, { useState, useTransition } from "react";

const UploadForm: React.FC = () => {
  const [isPending, startTransition] = useTransition();
  const [result, setResult] = useState<{
    success: boolean;
    error?: string;
    altText?: string;
  } | null>(null);

  // more to come...
We need a function to handle submitting the form and do some initial validation by ensuring there is an image in the form.
  // continuing from above

  const handleSubmit = async (e: React.FormEvent) => {
    e.preventDefault();
    const formData = new FormData(e.currentTarget as HTMLFormElement);
    if ((formData.get("image") as File)?.size === 0) {
      setResult({ success: false, error: "Please select an image file" });
      return;
    }

    startTransition(async () => {
      const result = await uploadImageAction(formData);
      setResult(result);
    });
  };
In this case, we create a FormData object using the form that has been submitted. If the user hasn’t chosen an image, we short circuit and fail the submission with an error message in the state. Otherwise, we use the startTransition function to help trigger the server action. Using startTransition means that we can track the state of the request using the value in isPending. Once the action is complete, we update the state with the result.
The rest of the code is the HTML for the form itself, including some logic to show errors, results and whether the request is pending:
  // continuing from above

  return (
    <form onSubmit={handleSubmit}>
      <div>
        <label htmlFor="image">Image:</label>
        <input type="file" id="image" name="image" accept="image/*" />
      </div>
      <div>
        <label htmlFor="instructions">
          Instructions, important information, or context for the image:
        </label>
        <textarea id="instructions" name="instructions" />
      </div>
      <div>
        <button type="submit">{isPending ? "Uploading..." : "Submit"}</button>
      </div>
      {!isPending && result && !result.success && (
        <div>
          <strong>Error:</strong> {result.error}
        </div>
      )}
      {!isPending && result && result.success && (
        <div>
          <h3>Generated Alt Text</h3>
          <div>
            <textarea value={result.altText} rows={4}></textarea>
          </div>
        </div>
      )}
    </form>
  );
}
On the server side of things, we create a server action in the src/app/actions directory called upload.ts. The function we write here will respond to form submissions and call the Langflow API with the data. You can check out the full code for the server action here.
First, we import the Langflow Client from the package we installed earlier and configure it using the URL, flow ID, and API key we gathered earlier.
"use server";

import { LangflowClient } from "@datastax/langflow-client";

const client = new LangflowClient({
  baseUrl: process.env.LANGFLOW_URL,
  apiKey: process.env.LANGFLOW_API_KEY,
});
const flow = client.flow(process.env.LANGFLOW_FLOW_ID);
Once we’ve configured the client, we create a reference to the flow using the flow ID. We can use this object to run the flow with our input.
The server action itself takes a FormData object as an argument and then uses the data to call the Langflow API.
Files and Tweaks
While we can send the text instructions directly to the flow, we need to do something a little extra with the image upload. First, we use the Langflow file upload API to upload the image and get a path.
Then, we use the path and the ID of the Chat Input component to make a tweak to that component. Tweaks can be used to change any of the inputs for any component in the flow, so you could, for example, swap out models on the fly. In this case we use it to set the image path for the input.
We initially call flow.uploadFile with the uploaded image. Then we call flow.run passing the instructions text and adding the tweak to include the uploaded file as well.
export async function uploadImageAction(formData: FormData) {
  try {
    const imageFile = formData.get("image") as File | null;
    const instructions = formData.get("instructions") as string | null;

    const upload = await flow.uploadFile(imageFile);
    const response = await flow.run(instructions ?? "", {
      tweaks: {
        [process.env.LANGFLOW_CHAT_INPUT_ID]: {
          files: upload.filePath,
        },
      },
    });

    return {
      success: true,
      altText: response.chatOutputText(),
    };
  } catch (error) {
    console.error("Error processing upload:", error);
    return {
      success: false,
      error: "Internal server error",
    };
  }
}
That’s how you can call a Langflow flow from a Next.js application with text and an image to get a result. I recommend reading through the full application to see it in greater detail.
Extending the app
This is a simple application, with just a form for uploading an image and a server-side action. It aims to encourage users to collaborate with the model and give it more context when generating the description of the image. The app also encourages the user to edit the generated alt text by presenting it in a text area. The full application also suggests further tips for writing good alt text.
A standalone application may not be ideal for this sort of feature though. However, it is a good starting point if you wanted to add alt text generation into a situation that requires image uploads, like a rich text editor or a social media image upload. In those applications, you could provide the context of the paragraphs around the image to help the model generate the most useful text possible, while still allowing for human editing.
Remember, AI tools like this are there to help, not replace the work.
Next steps
You can explore the full code of the app on GitHub and play with the hosted version of AltTextr here.
If you want to check out some other Langflow projects, take a look at this Deep-Research agent, or this app that generates images with Langflow.


